I made Ko Ko to show off the chocolate Shweshwe prints at the Nashville show. I did not originally plan to develop a pattern too. Probably because I couldn't envision getting the pattern finished before the show. I cut out the quilt around July 15 and finished the binding on August 16, the day before Elizabeth left for Nashville. That might not sound too remarkable, but I had to go to work 5 days a week. (Employers are so demanding, aren't they?)
There was a lot of interest in the quilt so after the show I started thinking about what could be included in the pattern to make it have value.
The block in this quilt is great because it is made of 16 half-square triangles assembled in a pleasing manner. It doesn't take much work to make a block that is "pleasing" because the Shweshwe itself is interesting and striking. The block does not involve complicated piecing. Make the half-square triangles, arrange them, make the rows, and sew the 4 rows together. Move on to the next block.
Each 8" block has 32 pieces and a lot of seams - some a bit on the bulky side. I think pressing effectively is the biggest challenge with this quilt. So I made the pressing instructions in the pattern very specific.
I didn't have a name for the quilt immediately, but it was named while I was still piecing. The name comes from the Ladies Detectives books by Alexander McCall Smith. (The name is explained on the back cover.) I love those books. Once I started thinking of the quilt as Ko Ko, it reminded me of the books and that made me happy. Ko Ko and I had bonded.
Tuesday, September 30, 2008
Sunday, June 22, 2008
Southern Cross
Elizabeth was in the process of finalizing her U.S. citizenship. I have always lived in the U.S and always will. I am happy here and this is my home. I wondered how I would feel if circumstances caused me to leave a country, home, and family that I love to permanently move to another land. I think there would always be a place in my heart for the first country.
I wanted to make a quilt using the indigo and red Shweshwe to celebrate Elizabeth becoming a U.S. citizen. It would be a patriotic sort of quilt, but I also wanted to tie it to South Africa. Elizabeth had told me about the Southern Cross constellation which is only visible from the southern hemisphere. I decided to incorporate it into the quilt.
The Southern Cross has 5 stars in it. When viewed, 4 stars are approximately the same size and the 5th one appears smaller. At first I was thinking in terms of pieced star blocks arranged in some manner in the center of the quilt surrounded by a pieced border. I couldn't quite get a handle on it. Then I decided to applique the 5 stars. That was the breakthrough.
- The center appliqued block would have red stars against an indigo background. It would be 12" finished with a red 1" inner border.
- The outer border would be pieced from 7" indigo and red log cabin blocks arranged in a star formation. The strips in the log cabin block would be 1" finished.
- The corner log cabin blocks would contain all indigos.
Chocolate Pudding
Many of the quilts that I make take shape as they progress. They grow to be whatever size they end up being. They don't symbolize anything in particular, but they may take on meaning and form personalities as they go along.
Chocolate Pudding is not that kind of quilt. It was symbolic from the start. I met Elizabeth's family (her husband Steven, her mother Tersia from South Africa, and her in-laws Judy and Larry from North Dakota) in April of 2008. I'd learned from Tersia that a South African dessert may be called pudding even though it is not pudding as I know it. I wanted to make another sample for Marula Imports and these were the thoughts in my head:
Chocolate Pudding is not that kind of quilt. It was symbolic from the start. I met Elizabeth's family (her husband Steven, her mother Tersia from South Africa, and her in-laws Judy and Larry from North Dakota) in April of 2008. I'd learned from Tersia that a South African dessert may be called pudding even though it is not pudding as I know it. I wanted to make another sample for Marula Imports and these were the thoughts in my head:
- The sample would feature the chocolate brown Shweshwe.
- I would produce a pattern for this quilt.
- I would use the Cake Stand block because cake is a dessert that is not pudding. I decided that the blocks would be 8" finished. (I prefer blocks that are 9" or smaller. Cake Stand works best if the block size is an even number. I thought a 6" Cake Stand block might intimidate some quilters.)
- Since it featured the chocolate prints, the quilt would be called Chocolate Pudding.
- The sample did not need to be a large quilt. (I am fond of making large lap and bed size quilts.)
- The sample needed to use fat quarters, but incorporate different prints. (I like using a lot of different fabrics and wanted to give others the opportunity to use different Shweshwe prints.)
- I would use light shirtings and double pinks to show the chocolate Shweshwe to advantage. (I am a fairly traditional quilter with a fondness for reproduction fabrics.)
At this point I got out the graph paper and sketched the quilt:
- The center featured 5 Cake Stand blocks set on point. The blocks had chocolate and pink against light shirtings.
- The border was pieced so it could be primarily brown with a chain of pink squares. I wanted the pink squares to be larger at the corners. The border ended up having 2 different blocks in it - Double Four-Patch and modified Puss in the Corner.
- Since the blocks were on point, setting triangles were also needed. If the setting triangles were cut in the normal manner, it would require 13" Shweshwe squares. To avoid a lot of waste, the setting triangles would be cut from two fabrics at the most. I pieced the setting triangles in order to use a wider variety of prints.
On the night that I cut the pieces, I only had 5 chocolate prints on hand, but they were half-yards instead of fat quarters. I pieced the quilt using those 5 prints even though I knew that 8 fat quarters would be needed. (You know how it is. When you are ready to do something, you are ready. You cannot stop yourself.)
Marula Designs
Marula Designs is a line of quilt patterns designed for Marula Imports. The patterns feature an African cotton called Shweshwe. Marula Imports is owned by my friend, Elizabeth.
Elizabeth and I work together. She was planning a trip home to visit family in South Africa and knew I was a quilter. She asked me if there was some kind of fabric she could bring back for me. (Have you ever known a quilter to answer "No" to such a question?) A long time ago I had purchased an African fabric from a vendor at a quilt show and had used it to make a quilt. All that remained were a few scraps. I showed them to Elizabeth.
She returned from her trip with ten different prints. We were both excited about the prints, but Elizabeth was also excited and impressed by the Da Gama company that makes Shweshwe. 45% of the company is owned by its workers and it supports many worthwhile community projects. Marula Imports was born, the website was created, and Elizabeth made plans to vend at quilt shows.
I made plans to provide Elizabeth with samples for her booth. At the first show there were requests for patterns. Marula Designs came into being.
Saturday, February 23, 2008
How Do I Quilt Thee - Revealed
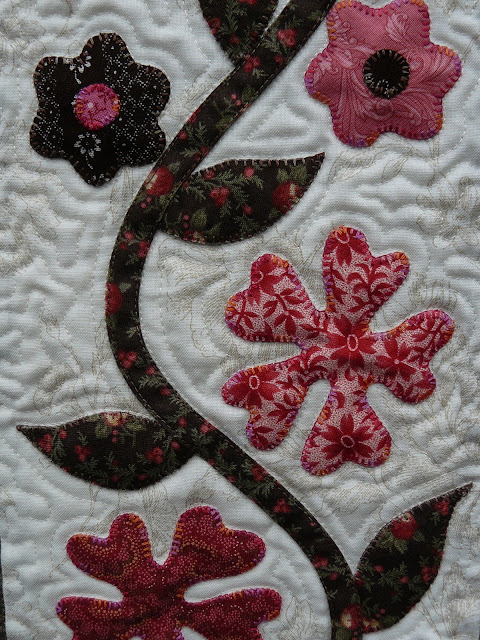
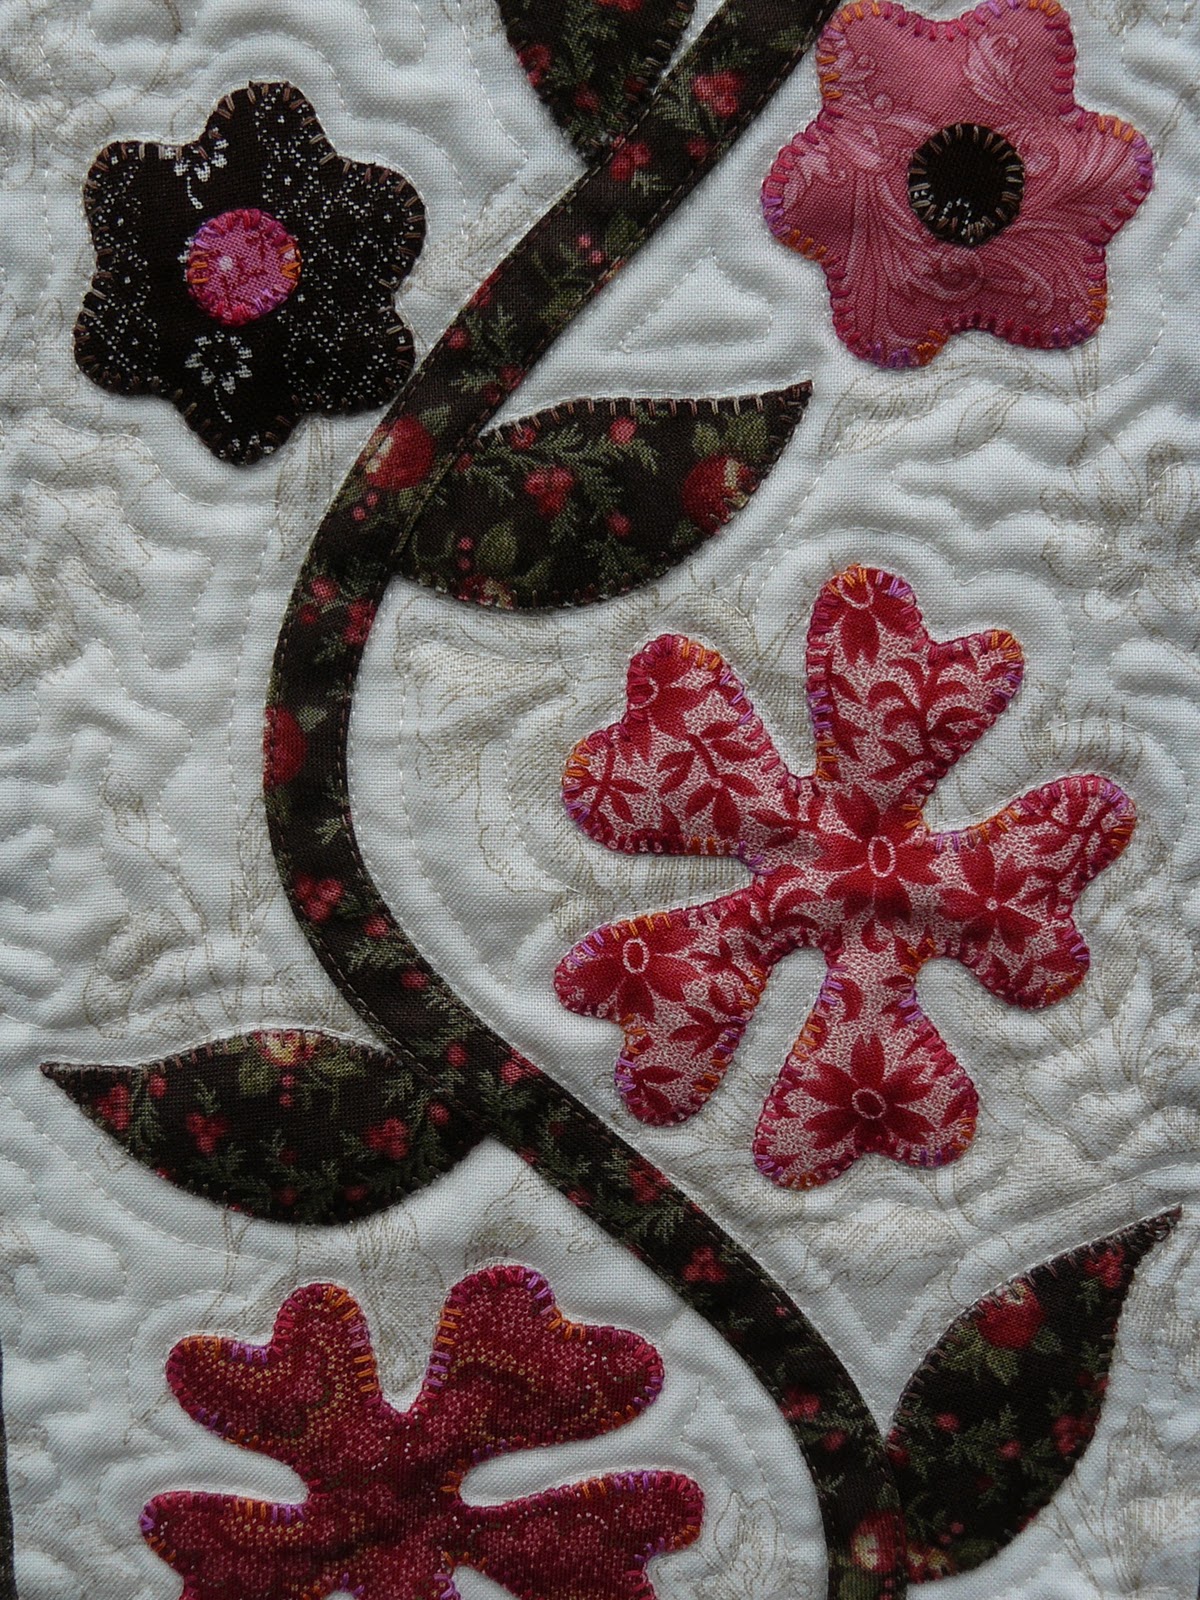
I started quilting today. I have a good idea how to proceed, but I don't have every detail worked out. There will be a lot of quilting in the ditch and echo quilting. I need something cool and fancy for the upper right/left corners.
I've chosen Hobbs wool batting. I had been mulling over the thread decision for quite awhile and have chosen to quilt with YLI 100 wt. silk thread. The only reason I was hesitating is because of the extra cost of silk thread. The colors are brown (235) and off-white (212). I will try not to use monofiliment for in the ditch quilting. I am using silk in the bobbin too.
Step 1. Sat, Feb 23. Quilting the long straight seams in the ditch with the walking foot. I will use brown when I am quilting on brown and off-white when quilting on the light parts. The bobbin thread will always match what I'm using on top. I begin and end with 5 short stitches, but I am still burying the ends of the thread instead of just cutting them off.
Step 2. Quilting in the ditch free motion between the star blocks and the setting triangles. Half of the time I am quilting on the brown fabric and the other half is on the light fabric. I am using the brown thread and trying to stay IN the ditch. In step 3 I was going to quilt the pieces of the star block in the ditch. I discovered that I could do this in step 2 with one start/stop per strip of 6 blocks. This is exciting because I can remove the pins in the star blocks after quilting. Removing pins feels like progress.
Step 3. Sun, Feb 24. Quilting in the ditch around the applique. Normally I would have done this on the vertical strips in the center of the quilt next, but I have very little light thread left and wanted to continue work. I am quilting around the applique in the border using the brown thread. This step is really fun. It is easy to see where to quilt, which is not always the case with marked quilt designs. It is close to the edge so there is not any bulk to deal with. Even though the flowers are not connected to the vines, I am sneaking over to the flower at the point where it is closest to the vine. This means I will have one start/stop. And finally, I get to remove more pins. This step progressed pretty quickly, but was interrupted by a trip to the Indiana Heritage Quilt Show from Feb 27 through March 2. When I returned, I spent some time getting caught up and then resumed quilting. By now I had more light thread so I quilted in the ditch around the applique in the light strips.
Thurs, March 6. I turned in an entry form for our quilt show so now I have to get this finished by April 2. Pressure.
Step 4. Wed, March 12. I prepared the Golden Threads papers for quilting the designs in the setting triangles. On Thursday I started quilting them.
I was so consumed with meeting the quilt show deadline that I did not journal the remaining steps as they occurred. This is how I proceeded.
Step 5. I quilted the design in the brown setting triangles, using the brown thread.
Step 6. I quilted continuous curves on the pieces of the Ohio Star blocks, using the brown thread.
Step 7. I stippled the light background of the Ohio Star blocks, using the light thread.
Step 8. I stippled the unquilted parts of the brown setting triangles, using the brown thread.
Step 9. I did a combination of echo quilting and stippling in the background of the light center strips, using the light thread.
Step 10. I quilted trellis-like shapes in the upper right and upper left corners, using the brown thread. (I wish now that I had appliqued the shapes in the corners.)
Step 11. I did a combination of echo quilting and stippling in the background of the borders, using the brown thread.
Step 12. I did some additional quilting on the largest of the flowers and on the container in the top border.

All of the stippling is what I consider to be medium density. I used approximately 2500 meters of the YLI brown and approximately 1000 meters of the YLI light thread.
I put the How Do I Quilt Thee poem on the label and attached it. I used the traditional binding on the quilt. Without further ado...

Thursday, February 21, 2008
Just Taking a Break
I am in the middle of pinning a large quilt. It has to be positioned and secured 6 times. I just finished pinning the third positioning. Actually, I don't think this is a break. I will stop for the night.
There are so many different kinds of quilting to be done.
There are so many different kinds of quilting to be done.
- Serious quilting. That is what I do to continue growing as a quilter. These quilts improve new skills (like machine applique) and help me hone old skills (like machine quilting or quilt design). How Do I Quilt Thee is serious quilting.
- Inspired quilting. This is quilting that I didn't plan to do, but suddenly I am in the midst of it. Acorns was inspired quilting. It is not a bad thing to do. It is sort of like serious quilting, but with a more devil-may-care, playful approach. There is less pressure.
- Special occasion quilting. Baby quilts, wedding quilts, graduation quilts, and so forth.
- I-want-to-make-that quilting. I see a pattern that I really like and I just want to make it. Miss Rosie's trunk show in January is a prime example of just wanting to make someone else's pattern. I wonder...do the big name quilters like Diane Gaudynski, Sue Nickels, and others long to make these quilts too?
- I-meant-to-say-no quilting. But I said yes.
- Original designs that would be suitable for a book. These need to be easier than the "serious" quilts.
- I-want-to-do-something-with-that-fabric quilting. Suddenly I have another top to quilt.
Monday, January 21, 2008
A Cure for the Blues
Our guild's 2007-08 block of the month project involved nine 12" blocks. In spite of the fact that I don't like large blocks, I made three sets of them:
In early January, I got the first two sets assembled into tops. The all blue set was the best of the three. I decided to see if I could make myself like them by combining them with smaller blocks of varying sizes. I could even include some appliqued blocks. I tried to work it out in my head and on paper how I might do that and it was too difficult. I finally threw caution to the wind and started making other blocks and assembling them into rows. The first row was 18" by 47". That meant all other rows would be 47" wide. The second row was 24" deep. The third row was 12" deep. The final row will be at least 12" deep, possibly 18".
I absolutely love it! It was the cure for the blue blocks, thus the name of the quilt - A Cure for the Blues.
- blue and brown
- rust and green
- assorted shades of blues
In early January, I got the first two sets assembled into tops. The all blue set was the best of the three. I decided to see if I could make myself like them by combining them with smaller blocks of varying sizes. I could even include some appliqued blocks. I tried to work it out in my head and on paper how I might do that and it was too difficult. I finally threw caution to the wind and started making other blocks and assembling them into rows. The first row was 18" by 47". That meant all other rows would be 47" wide. The second row was 24" deep. The third row was 12" deep. The final row will be at least 12" deep, possibly 18".
I absolutely love it! It was the cure for the blue blocks, thus the name of the quilt - A Cure for the Blues.
Subscribe to:
Posts (Atom)